This tutorial provides detailed steps with introduction to tablespaces, Datafiles and Creating Tablespaces using three ways via SQL Plus, iSQL Plus and Enterprise Manager and also demonstrates the differences in creating the tablespaces using these 3 methods.
Defining Tablespaces
Each Oracle database is divided into one or more logical units called tablespaces. A tablespace is a logical grouping of related data.
Each database has at least one Tablespace called SYSTEM Tablespace. As part of the process of creating the database, Oracle automatically creates the SYSTEM tablespace. Although a small database can fit within the SYSTEM tablespace, creating a separate tablespace for user data is recommended.
A database administrator can use Tablespaces to do the following:
- Control disk space allocation for database data.
- Assign specific space quotas for database users.
- Perform partial database backup or recovery operations.
- Allocate data storage across devices to improve performance.
Defining Data Files
Data is stored in the Oracle database in form of files called as datafiles. Each Tablespace is a collection of one or more Datafiles. Each data file consists of ‘Datablocks’, ‘Extents’ and ‘Segments’.
Some systems put a limit on the number of datafiles that can be used. So, efficient definition of tablespaces and datafiles is important.
Creating Tablespaces
There are three ways to create a tablespace in Oracle10g: Using SQL Plus, Using iSQL Plus, Using Enterprise Manager.
Creating Tablespaces using SQL Plus
- Logon to 10g SQL*PLUS using your administrator user id and password.
- Type the following command on the SQL prompt (figure 1):
CREATE SMALLFILE TABLESPACE "TESTTBLSPCE" DATAFILE 'C:\ORACLE\PRODUCT\10.1.0\ORADATA\ORCL\testdtfile' SIZE 100M LOGGING EXTENT MANAGEMENT LOCAL SEGMENT SPACE MANAGEMENT AUTO;
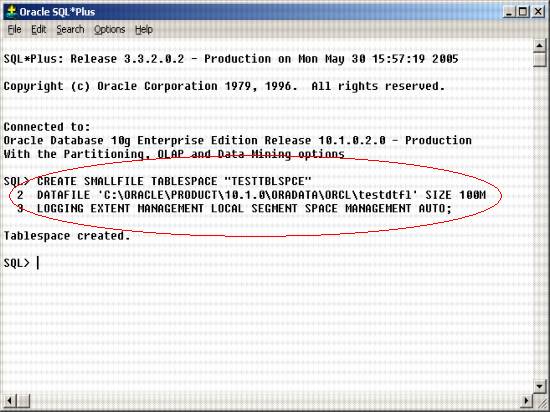
Figure -1 Creating Tablespaces using SQL Plus
Note: Oracle10g provides a facility to alert the DBA about filling up of table space, based on the values of tablespace thresholds. This will alert the DBA when the tablespace fills up to ‘Warning’ and ‘Critical’ levels. To activate these alerts, set the thresholds using the following code.
Creating Tablespaces using iSQL Plus
1. To connect to iSQL*PLUS, open the Internet Explorer and enter the following URL.
http://
2. Use the administrator user id and password to login to iSQL*PLUS.
3. On the ‘Workspace’ tab (figure 2), enter the following command:
CREATE SMALLFILE TABLESPACE "TESTTBLSPAC" DATAFILE 'C:\ORACLE\PRODUCT\10.1.0 \ORADATA\ORCL\testdatfile' SIZE 100M LOGGING EXTENT MANAGEMENT LOCAL SEGMENT SPACE MANAGEMENT AUTO
4. Click ‘Execute’.
5. The iSQL* Plus window displays ‘Tablespace Created’.
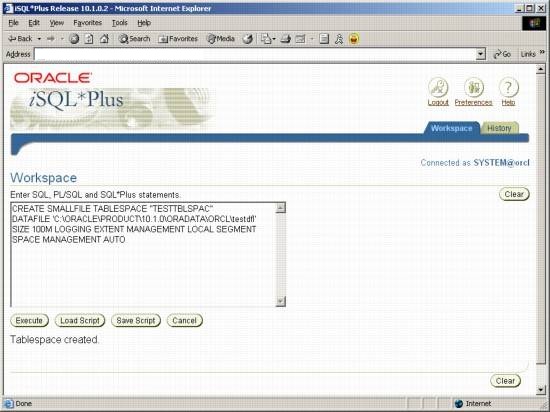
Figure -2 Creating Tablespaces using iSQL Plus
Note: The tablespace thresholds can be set in iSQL Plus using the following code:
BEGIN DBMS_SERVER_ALERT.SET_THRESHOLD(9000,NULL,NULL,NULL,NULL,1,1,NULL,5,'TESTTBLSPC');
END;
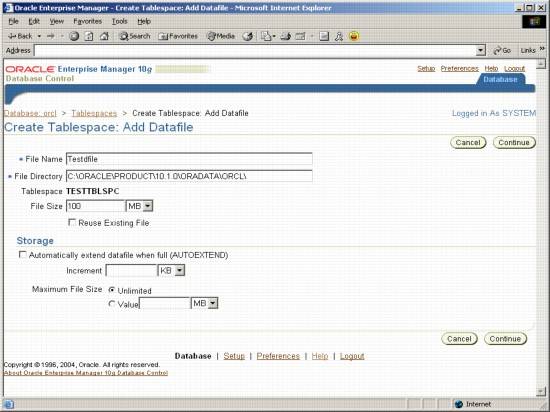
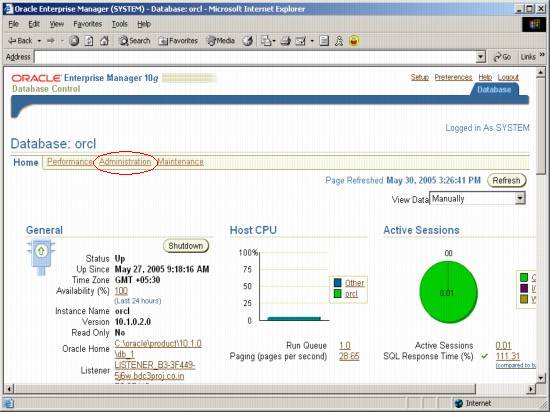
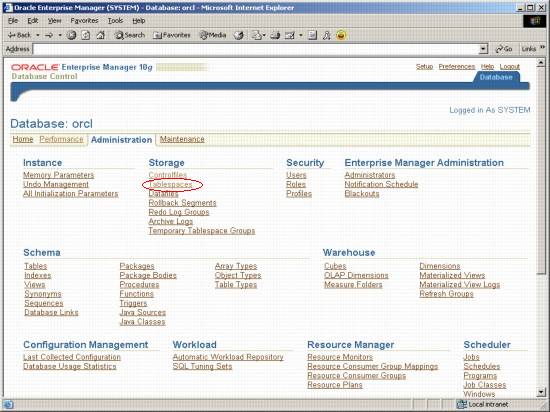
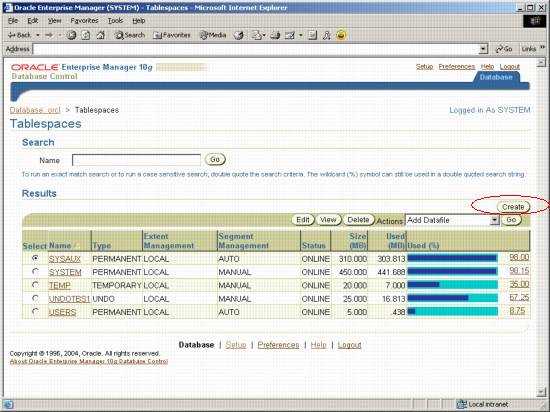
1. Open Internet explorer and enter the URL for Enterprise manager (http :// 2. Click on the Administration tab as shown in the figure 9 below. Figure -9 Oracle Enterprise Manager Window 3. Click on Tablespaces as shown in figure 10. Figure -10 Administration Window 4. The Tablespaces window appears as in figure 11. Click on Create button. Figure -11 Tablespaces Window 5. Enter the new tablespace name in the ‘Name’ field. i. In ‘Locally Managed’ tablespaces, free space is managed in a bitmap at the head of the file. Also, the process of finding free space is faster. Figure -12 Create Tablespace Type: Select whether you want this to be your permanent tablespace, temporary tablespace or undo tablespace. A short explanation on the these is below: 6. Click on the ‘Add’ button in the ‘Datafiles’ region (figure 13). Figure -13 Create Tablespace (Add datafiles button) 7. Enter a ‘File Name’ for the new data file. 8. Click ‘Continue’. The create tablespace window will be displayed again. Figure -14 Create Tablespace (Add datafile window) 9. Click ‘OK’. The new tablespace is now created. In the next tutorial we will learn about Managing Tablespaces, Altering Tablespace , Creating an ‘Undo’ tablespace and Renaming a Tablespace using SQL Plus, Using iSQL Plus and Enterprise Manager.Creating Tablespaces using Enterprise Manager
Other controls on this form are explained below:
· Extent Management: This control allows the user to select the method used for extent management.
ii. In ‘Dictionary Managed’ tablespaces, the segments can be of any size. This can (and frequently does) lead to free space fragmentation. This leads to slower free space allocation. 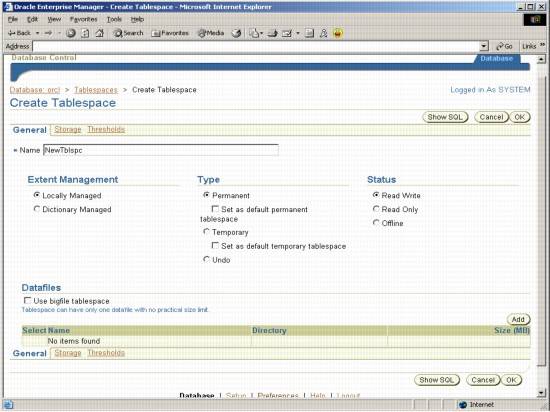
i. In case off a ‘Permanent’ tablespace, the extents are allocated and de-allocated using the data dictionary. We must make expensive, serialized recursive SQL calls to allocate extents in this tablespace and to free them when we are done.
ii. In case of a ‘Temporary’ tablespace, we will allocate an extent only once and then keep it. These extents will be managed not via the data dictionary but they are managed in memory. This avoids the expensive recursive SQL calls for allocating and de-allocating extents. You will never see an extent freed in this tablespace until you shutdown (or alter the tablespace in some way).
iii. This page allows you to create an ‘Undo’ tablespace and assign it to an individual instance. Under the ‘Undo’ option, you choose the instance from the ‘Assign It To Instance’ drop-down list. This option is part of the automatic management of rollback segments.
Status: Select whether you want this tablespace to be ‘Read Only’, ‘Read Write’ or ‘Offline’. The read write table spaces allow both read and write operations while the read only tablespaces allow only read operation.
When you offline the tablespace, Oracle does not allow you to initiate a DML on any of the tables in that tablespace. However it allows for the transaction to be complete (i.e. commit or rollback). It stores the undo entries related to the active transaction in the deferred rollback segment in the SYSTEM tablespace when the tablespace goes offline. When the tablespace is back online, it applies those entries to the data blocks, hence completing the recovery.
Datafiles: This region allows you to define the datafiles in this tablespace.
If the option ‘Use Bigfile Tablespace’ is checked, the tablespace can have only one datafile, which employs a bigfile tablespace. Bigfile tablespaces are supported in locally managed tablespaces only. Using this option increases the size of the oracle database, as the bigfile tablespaces put almost no limit on the size. 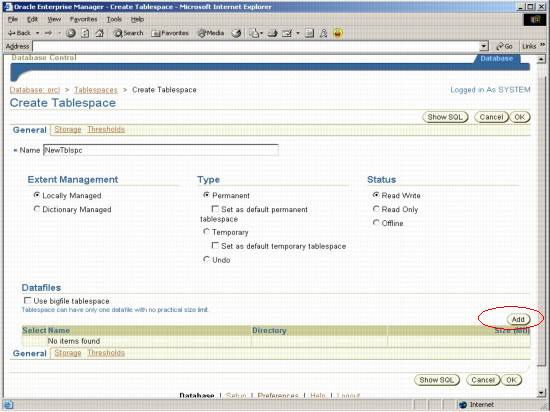
Other controls on this form are explained below:
Storage: The ‘Automatically extend datafile when full’ option indicates whether you want your datafile to extend its size when it is full. If you select this option, you must fill up a value in the ‘Increment’ text field (how much the size of datafile should be extended every time it is full). Also, the ‘Maximum File Size’ can be specified. If you select the option ‘Unlimited’, then there is no limit on the max size of this file. If you select ‘Value’, then you need to fill in the max size for this datafile.